As a CAUTION, users need to use the EXACT same values as inputted in the custom fields, otherwise Apicbase won't recognize them.If you are new to importing ingredients into Apicbase, it is best to start with this article. Click here if you want toe learn more on downloading and uploading the ingredient file.
Column A (Apicbase ID): This column contains a unique Apicbase ID for this ingredient. The ID is created by Apicbase, you should never fill this in yourself. If you download a filled-in ingredient list of your existing ingredients, the Apicbase ID will be in there. If you download an empty template, this column will be empty. It is important that you use the correct Apicbase ID if you input new info on an existing ingredient. Read this article to learn more about the Apicbase ID.
Column F (Approved): This column indicates if the product is verified for production.
1 = Approved
0 = Not approved
1 = Allowed0 = Not allowed
1 = Validated
0 = Not Validated
1 = Contains2 = May contain traces of3 = Unknown
1 = contains this product0 = Does not contain this product
1 = this ingredient can be used for this diet0 = this ingredient can not be used for this diet
Columns CI: here you can fill in the ppm for sulfites
Columns CJ - DD (Nutrition Data): In these columns, you find the values for the Nutrition Data.
-
- CJ: Validated:
1 = the nutrition data for this ingredient is checked and validated0 = the nutrition data for this ingredient is not checked and validated
-
- CK: Validated at: date of validation
- CL: for weight: here you fill in the quantity for which the nutritional info is specified. Generally, this is per 100grams, so you fill in "100" here in this case.
- CM: for weight unit: Here you fill in the unit for the quantity for which the nutritional info is specified. In the former example, you fill in "g".
Columns DE - EF: Nutrition Data-Vitamins
Column EG: Custom column - This is a column set for custom fields that you can “Add/Change”.
As a CAUTION, users need to use the EXACT same values as inputted in the custom fields, otherwise Apicbase won't recognize them.
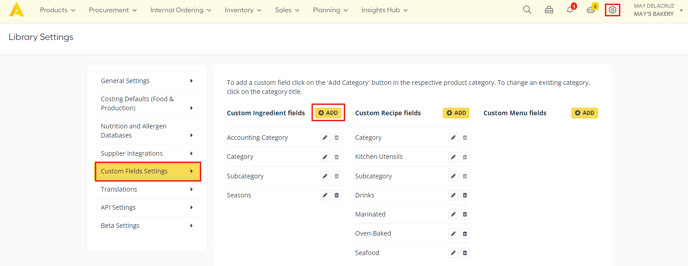
It is important to set the values of this custom field before you fill them in the template. Go to “Library Settings” then select “Custom Field Settings” then select “Add” on “Custom Ingredients Fields”
Add information that you can delete: You are not obliged to change the template but you have the option to switch it around. You would need to export the "Ingredients Excel File", delete some columns in that file and switch the other around and you will see that it also works. This won't break the import.