To connect your printer to Apicbase, an active Nicelabel account linked to the printer is essential. If you have any questions or need help during this process, please don't hesitate to contact your Apicbase Customer Success Manager (CSM) or the support team at Loftware for support.
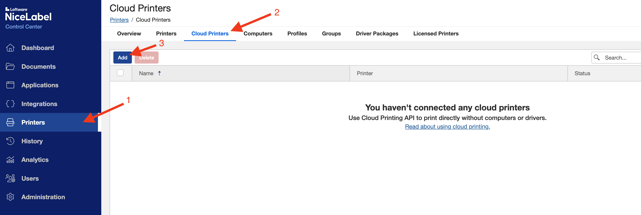
- Go to the Nicelabel Control Center. Go to Printers (1), then Cloud Printers (2), and click on Add (3).
Fill in the Printer Name (it can be any name, but preferably something easy to identify; don't use spaces or special characters) (1). Then select your Printer Type (in our case Zebra 200Dpi; don’t worry if the dpi doesn’t match exactly, take the most approximated one) (2). Copy the Server URL by clicking on the copy button (3), we will need this later, in Step 3.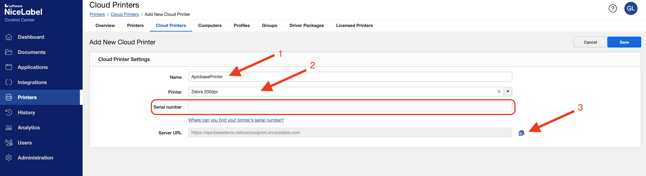
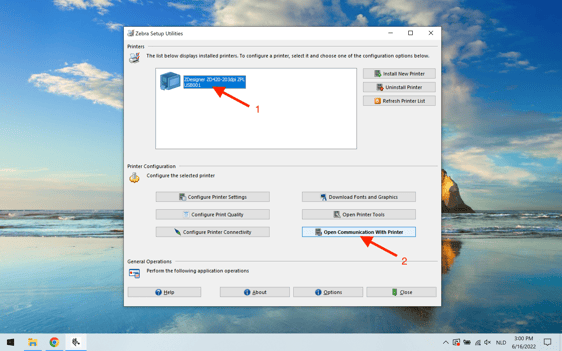
Adding the serial number will be our final step. We still don't have it and, for that, we will need to access the printer again. We will leave this page on hold while we obtain the serial number. - Open the Zebra Setup Utilities software. Make sure that your printer is connected to the computer via the USB-A to USB-B cable. Select your printer (1), then click on Open Communication with Printer (2). A communication interface will pop up.
- Copy and paste the following command in the upper part of the communication interface (1).
! U1 setvar "weblink.ip.conn1.location" "Your Server URL" <CR><LF>! U1 getvar "weblink.ip.conn1.location" <CR><LF>! U1 getvar "device.unique_id" <CR><LF>
Where the code says "Your Server URL", put the URL you copied from the Nicelabel Control Center in the previous step (keep the " on the sides of the URL) (2). Then, click on Send To Printer (3). If that button is locked, try to close the software, switch off and back on the printer, or disconnect and reconnect the cable between the printer and the computer. If you are not able to unlock the button, please contact the support team at Loftware for more assistance.
After a few seconds, the printer's output in the lower box should be the same server URL, followed by a number. That is your Serial Number, necessary to set up the connection to Nicelabel. You can copy it and write it somewhere else to make sure you keep it at hand. - Before going back to Nicelabel, one more command is necessary to reset the printer. Copy and paste the following command in the upper part of the communication interface (1).
! U1 setvar "device.reset" <CR><LF>
Then click on Send To Printer again (2). This will reset your printer to establish the changes made. You will see all icons quickly turning on and off, leaving the first icon red for a few seconds until it comes back to normal.
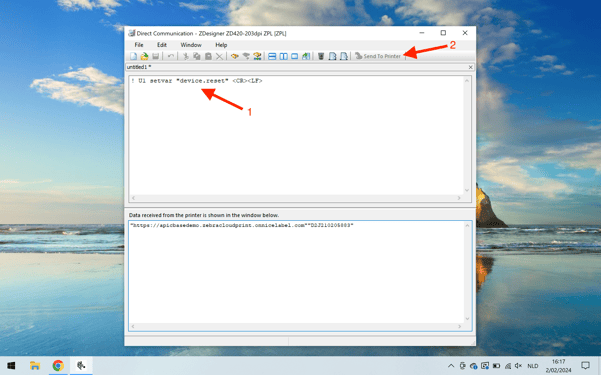
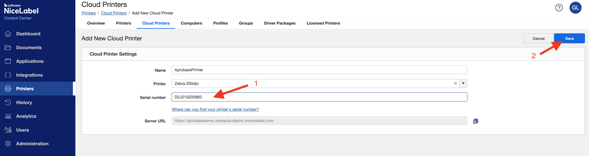
- Now, copy the Serial Number outputted by the printer (the number that appeared in the lower box during Step 3). Go back to the Nicelabel Control Center, paste it on the corresponding field (1), then click on Save (2).
A pop-up message might appear. In that case, click on OK.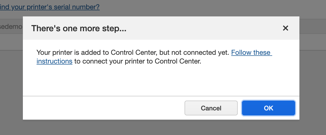
- Initially, the printer will appear as "Pending" in the list.

After waiting a few minutes and refreshing the page, the status of the printer should update to "Connected".
Done! Now with your printer installed, connected to the network, and linked with NiceLabel, we are one step away from having it all set up. The next step is to register the printer on Apicbase and, finally, enjoy the printing functionality! To do this, follow the instructions in the next article.