Once your printer is set and installed on your computer, you need to connect it to your network. This way it will be possible to link your printer with our cloud printing feature in Apicbase. Please, make sure that your printer is connected to the computer via the USB-A to USB-B cable before following these steps.
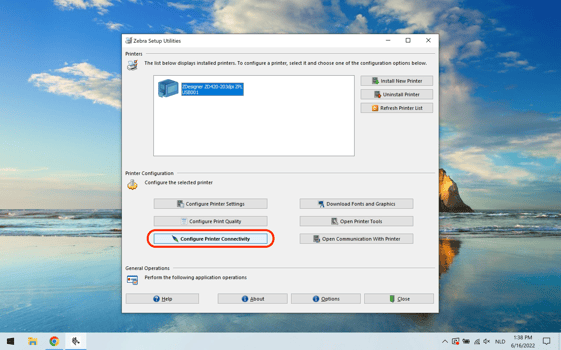
- Select your recently installed printer and click on "Configure Printer Connectivity”.
- Select the Wireless option.
.png?width=552&height=345&name=Untitled%20(14).png)
- Click on Next (DHCP is checked by default).
.png?width=559&height=350&name=Untitled%20(15).png)
- Click on Next (2.4 GHz & 5 GHz selected by default).
.png?width=564&height=352&name=Untitled%20(16).png)
- Click on Next (Other selected by default).
.png?width=565&height=353&name=Untitled%20(17).png)
- Put your wifi network name in the "ESSID” field. Select the security mode, very likely WPA-PSK/WPA2-PSK, which is the most common one. Then click on Next.
.png?width=567&height=354&name=Untitled%20(18).png)
- Select “String” and put your WiFi password in the “PSK name” field. Then click on Next.
.png?width=587&height=367&name=Untitled%20(21).png)
- Click on Next.
.png?width=594&height=371&name=Untitled%20(22).png)
- Click on Next.
.png?width=591&height=370&name=Untitled%20(23).png)
- Click on Finish (Printer is selected by default).
.png?width=600&height=375&name=Untitled%20(24).png)
You will notice that, after clicking on Finish, all your printer lights quickly blink and, after a few seconds/minutes, the network icon should become finally green.
 - Your printer should now be connected to your WiFi network and look like this.
.jpeg?width=557&height=280&name=Untitled%20(2).jpeg)
Done! Now with your printer installed, and connected to your network, we are closer to having it linked to Apicbase. The next step will be to set up and obtain your Subscription Key, an important part of the integration. To do this, follow the instructions in the next article.