![logo-mark-primary-color-4.png]](https://support.apicbase.com/hs-fs/hubfs/logo-mark-primary-color-4.png?height=40&name=logo-mark-primary-color-4.png)
To generate a purchase order, follow the steps below:
- Go to the "Procurement" module and click on "Create Orders".

- Choose the outlet for which you want to generate a purchase order.
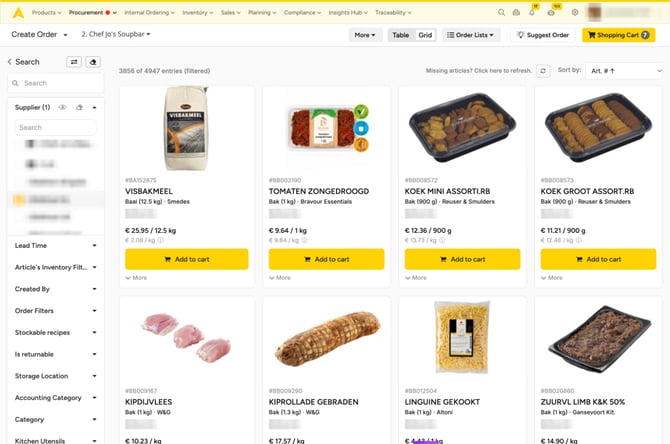
- Your ingredient list will appear. You can filter your ingredients to make it easier to find them. We filtered on a specific supplier.

Pictures appear only for products where your supplier itself provides one. You see them on the product cards in Grid view and on the lines in the shopping cart. On a computer, Create Order opens in Table view, which shows no pictures in the product list, so switch to Grid to see them. When the supplier has no picture, the card shows your own photo of the ingredient if it has one, and otherwise a grey placeholder. Pictures can take a few seconds to appear.
- Click on the "+" or type the quantity next to the ingredient you would want to order. You can use the "-" button to subtract items or the eraser button to delete the quantity.
- If you have set a par level for (some) ingredients, you can also click on the "To Par" button. Then the quantity will be automatically calculated based on the difference of the par level and the remaining quantity in stock.
- When you have set the items you want to order, click on "Your Shopping Cart" in the upper right-hand corner.

- When you click on the filter button
 you will only see the ingredients from this specific order on the left of the screen. This is easy if you want to make an adjustment to the order.
To see only what can arrive in time, pick a date in the Lead Time filter. The list then shows the articles whose lead time lets them be delivered by that date. The earliest date you can pick is tomorrow. Articles without a lead time are hidden while a date is set. Lead times come from integrated suppliers, so the articles of your other suppliers disappear until you clear the date.
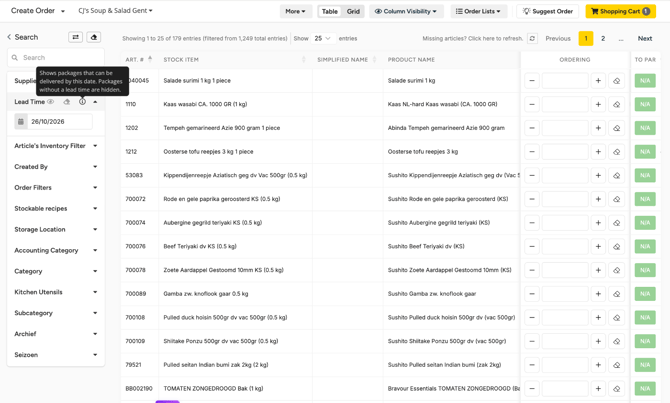
- You are able to change the quantity of each item by using the "-" and "+" buttons, or just filling in the right amount. You can also erase the item from the order by clicking the eraser button.
- Next, set a delivery date and time. You will see the possible delivery dates according to the lockup times you have set for this supplier. Read this article to learn more about setting lockup dates.
You set the Delivery Date and Delivery Time side by side at the bottom of the shopping cart, next to the total. A new cart starts on the supplier's first delivery day from tomorrow on, at 08:00.
- Delivery Date: type the date or pick it from the calendar. Days in the past, days the supplier does not deliver and days whose lockup time has passed are greyed out.
- Delivery Time: type the time in 24-hour format, for example 08:00, or set it with the hour and minute wheels. The time is optional.
A date or time that cannot be used shows an error under the field: Invalid date, Date must be today or later, This date isn't available or Invalid time. If you clear the date, the field stays empty. You cannot send the order while a field shows an error or the date is empty.
If the saved delivery date of a cart has passed, the cart moves to the next available date when you open it, and a message tells you so.

Remember that you have a tab for every supplier in your shopping cart. So if you create an order consisting out of ingredients from several suppliers, you can select the orders by clicking the tabs. You have to send each order to each supplier separately.
- Click on "E-mail Order" to generate the finished purchase order or click "Cancel" if you want to continue later.
The main button at the bottom of the shopping cart reads Send for integrated suppliers and E-mail Order for the others. If Send, E-mail Order or OCI Order is greyed out, check the cart for one of these:
- Your role does not have the Send Orders permission. Hover over the button to see the message. Ask an administrator to give you the permission.
- The delivery date is empty, the date or time field shows an error, or the supplier has no valid delivery dates.
- A line has the Cannot be ordered badge, and a warning shows at the top of the shopping cart. Remove that line from the cart.
- A line still needs a packaging type. An amber border marks it. Choose the packaging type.
- A quantity is not a multiple of the bundle size. The warning icon next to the quantity shows the bundle size.
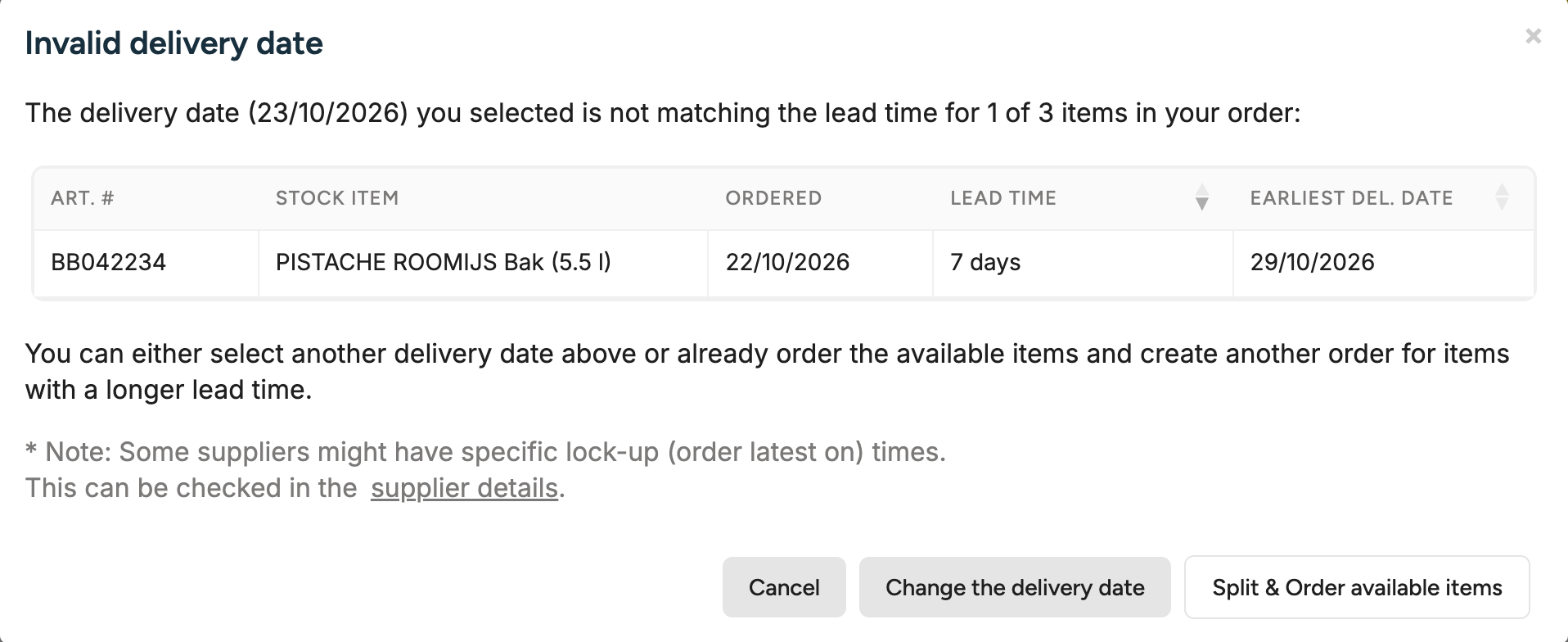
If some items need more lead time than your delivery date allows, the Invalid delivery date window opens first and lists them with their earliest delivery date. Choose Change the delivery date to go back to the cart and pick a later date, or Split & Order available items to continue with the items that can arrive in time. The other items move to a new cart for the same supplier, which you send later.
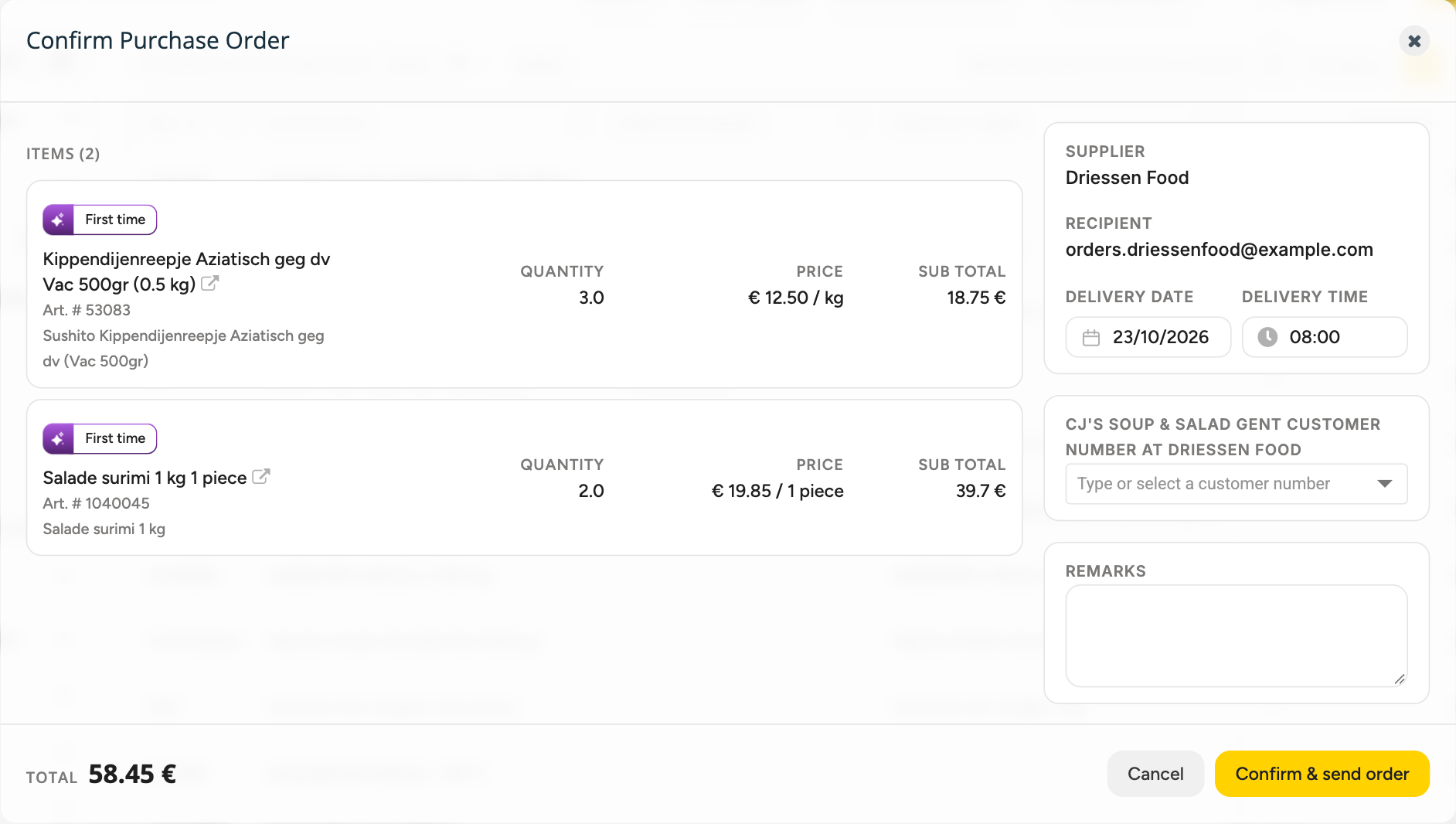
- You will see a popup that gives a final overview of the order and lets you fill in remarks and select your customer number.

- The Confirm Purchase Order step shows the supplier, the recipient, the delivery date and time and the order lines. You can still change the Delivery Date and Delivery Time here. If the new date is too early for some items, a warning lists them: they are not ordered now but move to a new cart. Choose your customer number, add remarks if needed and click Confirm & send order. Cancel closes the step and keeps the order in your shopping cart. The order will remain in your "Create Order" module.
For Bidfood, the delivery days depend on the customer number. The calendar follows the customer number you choose, and a delivery date outside that number's schedule is cleared so you can pick a new one. If no schedule is found for the number, check that the number is correct and contact Bidfood.
- If you have sent out the order, you will receive a copy in your mail. Your order will be listed in the "Sent Order" tab.
If you often order the same set of items, you can create order lists that you can load easily. Read this article to learn more about them.
Your supplier will receive the order per mail (and a copy goes to you). They will have an overview of the order, they can contact you or can create an export in Excel or CSV format or click "Print" button.

If the e-mail to the supplier cannot be sent, the order is not sent. It stays in your shopping cart with its lines and delivery date, and the confirmation step asks you to try again later. Close the step and open it again to retry. For an urgent order, follow the step-by-step guide to e-mail the order yourself and mark it as ordered in Apicbase.
Ordering on a phone or tablet
You can create and send orders on a phone or tablet. There is nothing to switch on. The shopping cart follows the width of your screen, so a narrow computer window shows the phone layout.
At the top, the shopping cart shows how many orders you have and their combined total, for example 3 Orders · Total: 245.80 €.
- On a phone, the shopping cart opens full screen and shows each supplier as a card with its number of items and its total. Tap a card to open that supplier's order. One card is open at a time, and the delivery date, delivery time and send button at the bottom belong to that order. Tap the open card to close it. With every card closed, the bottom of the cart is hidden, so open a card to send. Close the shopping cart with the X in the top right corner.
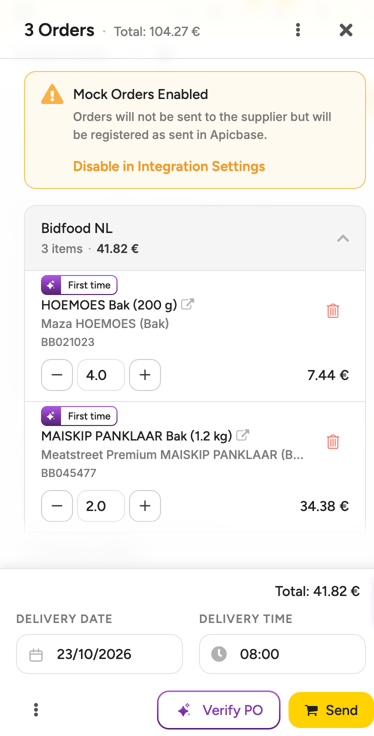
- On a phone, each line is a compact row: the names and the article number on top, the - and + buttons with the quantity and the sub total below. There is no photo or unit price.
- On a tablet or computer, the shopping cart opens as a panel on the right, with a tab per supplier. Click outside the panel to close it. On a narrower panel the price and the product photo are hidden. The sub total of each line always stays visible.
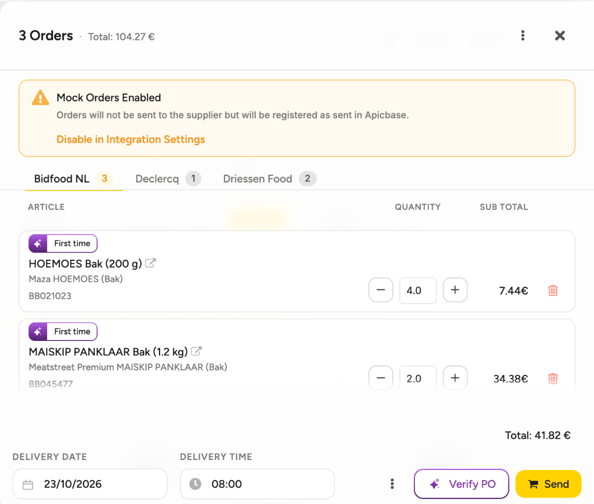
- Under the name of the stock item, each line shows the supplier's own name for the article and, below it, the article number, each on its own line. The supplier's name only appears when it differs from the stock item name. The article number is always shown in full.
- You delete a line with the trash icon at the end of the line. Swiping a line does not delete it.
- The product list on Create Order opens as Grid on screens up to 1024 pixels wide and as Table on wider screens. You can switch at any time. Apicbase remembers your choice while you keep that browser tab open.
Empty all carts, in the ⋮ menu at the top of the shopping cart, removes all your carts in progress at this outlet immediately, without asking for confirmation, and closes the cart. Carts of colleagues are not touched.