Table of Content
1. Why adding categories and custom fields?
Apicbase allows you to record a wide range of details about each ingredient, recipe or menu. They are not required for basic functionality but can be useful for detailed reporting and inventory control.
We have learned from our experience that most of our customers do fill in the ingredient and recipe category and subcategory. The accounting category is also often used because the stock reports are divided into accounting categories and give your accountant the necessary info to make year reports.
We advise to first think through which categorizations you need for ingredients, recipes and menus. It best to discuss this with everyone involved in using this data. If you create a good categorization system in the beginning, it will save you time in the long run. It takes a lot of time to change a lot of categories afterward.
2. Creating custom fields in your library
Before you can assign categories to ingredients, you must first create the corresponding custom fields. Apicbase allows you to add custom fields to Ingredients, Recipes, Menus, Outlets, Menu Cycles and Tasks & HACCP through the Library Settings:
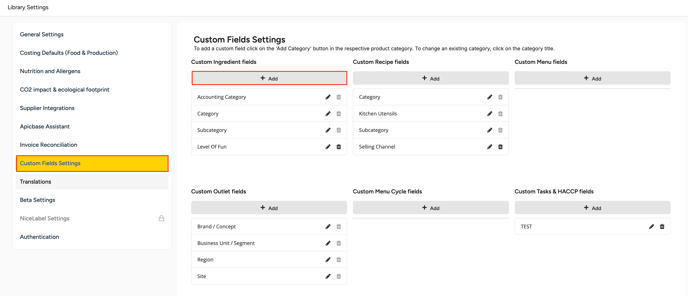
- Log in to your library and go to "Library settings".
- You will see a section called “Custom Fields Settings”. Here, you’ll be able to change the names of existing categories or add custom fields. There are different levels of custom fields: Ingredients, Recipes, Menus, Outlets, Menu Cycles and Tasks & HACCP. The Ingredients, Recipes, and Outlet level have standard custom fields set in your library. We advise you to first use these before creating new ones. If you want to read more on the "Kitchen Utensils" on the recipe level, read this article.
- If you want to create a new custom field click on “+ Add” and a popup will appear. Here you can fill out the name of your new category and the type of custom field and the values.
- To edit the name of an existing category, click on the “pencil” icon.
- To remove a field, click on the “trash bin” icon.
- There are three field types:
- "Single choice": only one value can be selected
- "Multiple choice": multiple values can be selected
- "Free text": you can fill in any text you want
- You can add values by clicking on "Click to add another value". Then just start typing.
- When you have added the values, you can delete them by clicking the trash bin icon or move the order by clicking on the arrow icon, hold and drag the value to another location in the list.
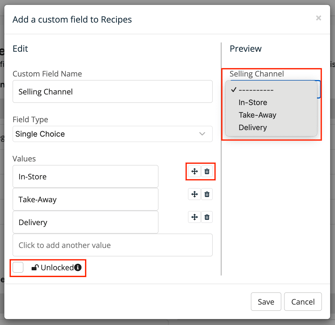
- You can lock a custom field by clicking the checkbox. This is to avoid that someone can edit or delete the custom field.
- In the preview, you can check how the field will look once saved.
- When you have added all info, just click on "Save".
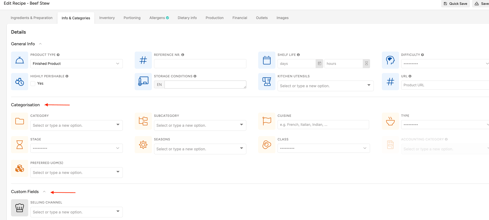
- Your new custom filed will now be added to the edit field of your ingredient, recipe, or menu in the tab "Custom Fields" of the "Info & Categories" tab, and it will also be added to your search & filter column.
- You also see the default Categories here.
In edit mode of your recipe, for example, you will see:
3. Creating custom fields in your outlet
Sometimes, you need different custom fields for each outlet because certain details such as storage locations can vary between outlets. Therefore, you can create and manage custom fields independently within each outlet.
- Log in to your library and go to "Outlet Settings ".
- Select the Outlet and click on "Edit Outlet Settings".
- Click on "Custom Fields" and you will have the possibility to set custom fields for the Inventory or Production Plan.
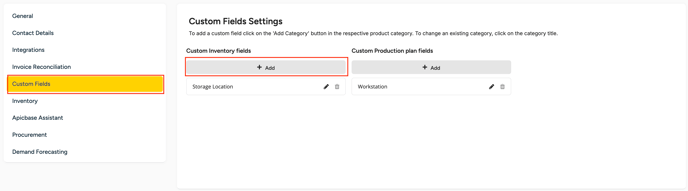
- If you want to create a new custom field click on “+ Add” to add a new custom field and a popup will appear. Here you can fill out the name of your new category and the type of custom field and the values.
- You can find your custom fields for your Inventory if you click on "Inventory" , select stock from the drop down menu and select the Outlet you created the custom fields for.
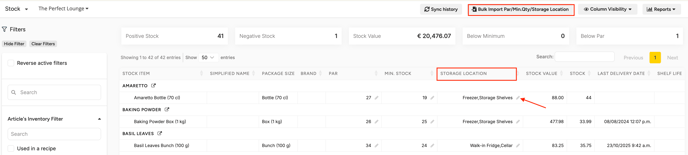
- You'll find the custom filed in you overview of your stock (e.g. storage location)
- To edit for click on the pencil and then on the arrow. You can also select multiple ones
- You can also add your storage locations in bulk if you click on "Bulk Import Par/Min.Qty/Storage location"
- Download your current stock list, add your storage locations and upload it again
- If the Production Plan module is activated, you find custom fields for your Production plan if you click on "Planning", select "Production Plan" from the dropdown menu and select the Outlet you created the custom fields for.
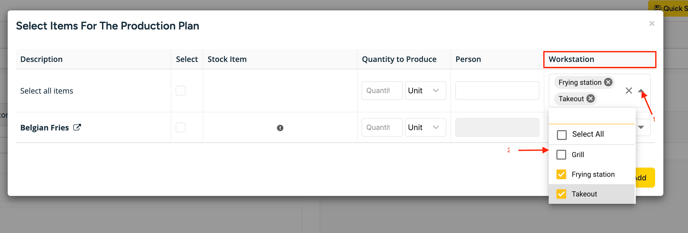
- While creating a Production Plan you can select values for you custom field (e.g. workstation)
- To edit click on the pencil and then on the arrow. You can also select multiple ones
Note: You can only add values that you already created in your library setting, also if you want to add them in bulk. If you want to add new values or delete existing ones from your custom categories, you’ll need to go back to your outlet settings.
4. How to add categories and custom fields for your ingredients and recipes in bulk
After you have created your categories and custom fields in your library, you can add them to your ingredients and recipes in bulk. This can be done using the ingredient or recipe import file.
For the ingredients, follow the steps below.
For recipes, you can follow the same procedure, but first navigate to the “Recipe” section of your library and use the Import page of the recipes.
- Go to "Products" > "Ingredients"
- Click on "Import & Export" > "Ingredients" > "from Excel"

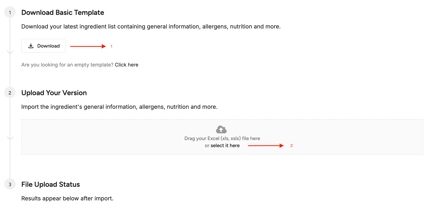
- Then, you will be redirected to the Import page, where you can download your latest ingredient list.
- By clicking Download, the file will be saved to your computer. You'll find your custom fields in the last columns.
- After you have filled out the custom fields, go back to the Import page and upload your file either by dragging and dropping it or by selecting it manually.
Your custom fields and categories are now added to your ingredients and recipes.
You can find them in the Info & Categories section in the Ingredients/Recipe Details, in the Ingredient/Recipe overview and as a filter option in the different modules.