Table of Contents
1. Introduction
3. Plan Recipes for Days and Courses Within the Cycle
4. Link Menu Cycles to Multiple Outlets
5. Edit and Customize Menu Cycles for Specific Outlets
1. Introduction
A menu cycle is the reusable definition of a repeating menu plan. It describes what recipes are served on which weekdays (and in which course), and how long the cycle runs. When scheduled, a menu cycle creates one or more menu cycle instances on actual calendar dates.
Do not confuse a menu cycle with a menu cycle instance:
-
A menu cycle defines the repeating structure (week 1, week 2, courses, planned recipes).
-
A menu cycle instance is one repetition mapped to real dates in the calendar, and is what you edit for one-off changes.
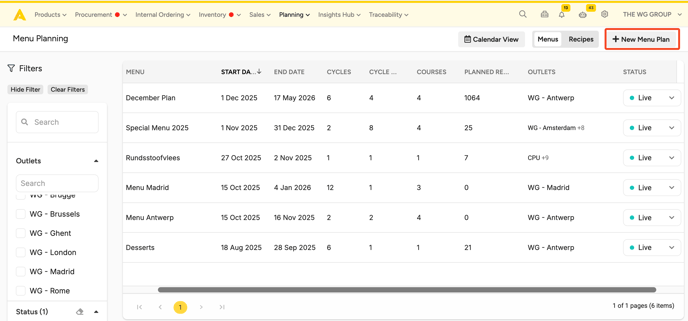
2. Create New Menu Cycles
Menu cycles can be configured as weekly or multi-week cycles, and scheduled to run once or repeat over time.
To create a menu cycle:
-
Open Menu Planning and go to the Menu Cycles overview.
-
Click New Menu Plan.
-
Enter the key schedule settings:
-
Menu cycle name
-
Cycle start date
-
Duration of one cycle (in weeks)
-
Repetition settings, such as:
-
End date, or
-
Total number of cycles
- Empty week(s) between each cycle
-
-
-
Define the courses you want to plan for (e.g. Starter, Main, Dessert).
- Assign at least one outlet.
-
Optionally add a description and any available custom fields (for example: season, customer, concept).
-
Save the menu cycle schedule.
3. Plan Recipes for Days and Courses Within the Cycle
Once a menu cycle is created, you can plan recipes in the cycle template by assigning them to a specific weekday, a specific course, and a specific week of the cycle (for multi-week cycles).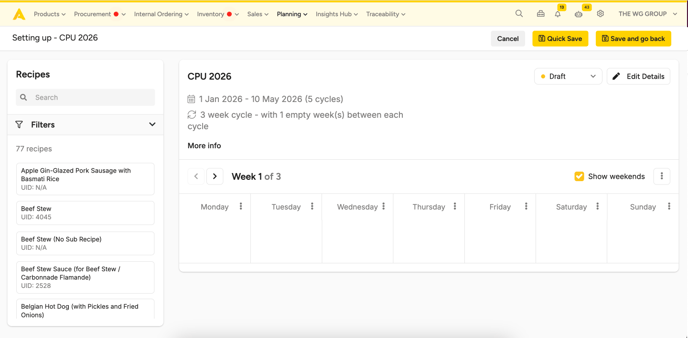
Note: as you're editing the Menu Cycle, this does not refer to specific dates.
The typical workflow for adding recipes to the Menu Cycle:
-
Open the menu cycle template.
-
Find recipes using search and filters (for example recipe category or custom fields).
-
Add recipes to days and courses (via drag and drop).
-
Optionally set a default planned quantity (number of portions) per planned recipe.
With the advanced options, you can schedule the recipe across multiple days and/or weeks.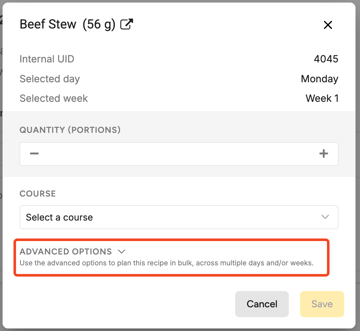
-
Save the cycle.
Notes on how planning behaves:
-
A recipe can be planned on multiple days in the same cycle.
-
On a single day within the cycle, the same recipe can only be added once.
-
Default quantities are applied to every repetition of the cycle, but can later be adjusted on specific dates via instance editing.
Tip: use "⋮" for copying or removing all recipes from a specific day or week.

4. Link Menu Cycles to Multiple Outlets
Menu cycles can be linked to one or more outlets. This allows central teams to plan menus once and apply them across multiple locations.
To link outlets:
-
In the menu cycle details ('Edit Details'), select the outlets the plan applies to.
-
Save the schedule.
Important behaviour:
-
One menu cycle schedule can be shared across many outlets.
-
Multiple menu cycles can run in parallel for the same outlet (for example a standard menu plus a veggie option cycle).
-
Outlets only see menu cycles that are linked to them.
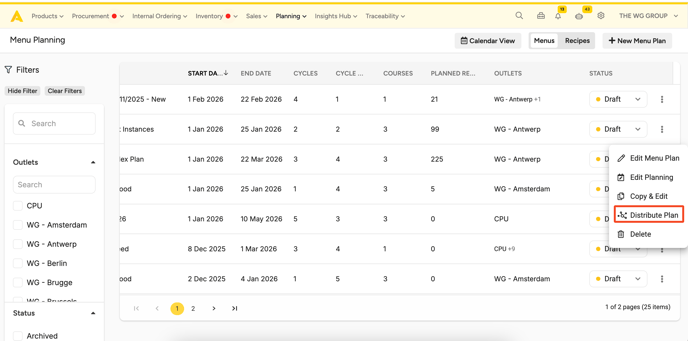
4.1. Distribute a Shared Menu Cycle Across Outlets
If a menu cycle is linked to multiple outlets, you can distribute it. This creates an outlet-specific copy of the menu cycle for each linked outlet, so each location can manage its own planned quantities locally.
This is useful when you want to define the menu centrally, but allow each outlet to forecast and adjust quantities independently. The quantities per outlet can still be aggregated later for ordering and production planning.
Distributing a menu plan is available when the menu cycle is linked to two or more outlets:
-
Open the menu cycle list view and select the shared menu cycle.
-
Click Distribute menu plan.
-
Confirm the pop-up message that explains Apicbase will create a copy per outlet.
-
Include planned quantities (checkbox)
-
When enabled, the current planned quantities are copied to each outlet’s menu cycle.
-
When disabled, each outlet receives the same menu structure but can define quantities locally.
-
After distribution:
-
Each outlet works on its own menu cycle copy.
-
These outlet-specific menu cycles are not meant to be re-shared across other outlets.
-
Quantities from all outlet plans can still be aggregated for ordering or production planning workflows.
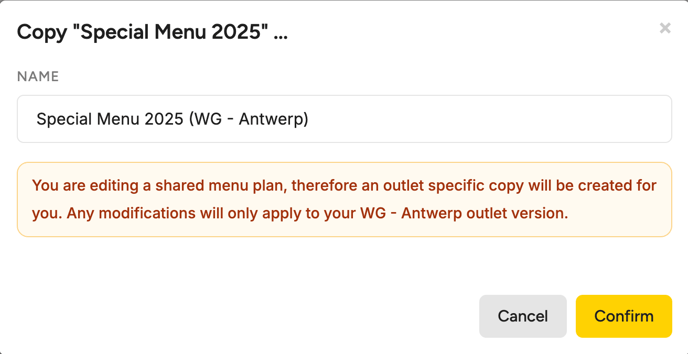
5. Edit and Customize Menu Cycles for Specific Outlets
In multi-outlet environments, a shared menu cycle may need to be adapted for one specific location. Apicbase supports this by allowing outlet-specific versions.
How this works:
-
If an outlet edits a shared menu cycle, Apicbase will inform the user that they are editing a shared plan.
-
When confirmed, the outlet is unlinked from the shared menu cycle and a new outlet-specific copy is created.
-
The original menu cycle remains unchanged for the other outlets.
-
The outlet now sees and manages only its own version of the menu cycle.
This allows central planning to remain consistent while giving each outlet the flexibility to deviate when needed.